Building a Mobile App Landing Page
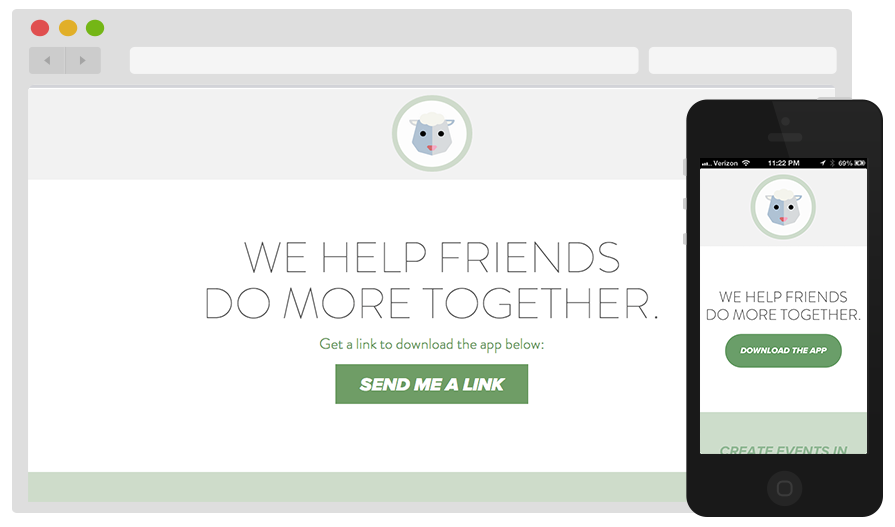
Over the last year I’ve been working on a mobile app called Flock. To get ready for our launch, I created a new landing page to allow people to easily download the app. On a desktop browser, it allows people to input their phone number and receive a text on their phone with a link to download the app. On a mobile device, it allows people to download the app directly.

The Ingredients
Twilio: An API to make and receive phone calls and send and receive text messages. I used this service to send a text message to desktop users containing a link to download the app.
fancyBox: Tool for displaying images, html content and multi-media in a Mac-style “lightbox” that floats overtop of web page
Creative Buttons: Button inspirations from Codrops
SASS: A CSS extension that adds nested rules, variables, mixins, and selector inheritance
Bourbon: A mixin library for SASS
Neat: A grid framework for SASS with Bourbon
Sending a Text
My first step was to get the text message part of the landing page working. High level I wanted to be able to send users a text message with a link to download Flock on their iPhone. To do this, I created a form to collect a user’s phone number, and then utilized a Twilio gem to send a message to the collected number.
Using the ‘twilio-ruby’ gem I was able to get a text message up and running relatively quickly by creating a form and adding the Twilio logic in the route associated with that form.
def send_text
  number = params[:number] # grab user's number from form and assign to 'number' variable
  account_sid = '**********************************' # received after creating an account with Twilio
  auth_token = '********************************' # same as above
  @client = Twilio::REST::Client.new account_sid, auth_token # create a Twilio client (used to send messages)
  @client.account.sms.messages.create( # method on client to create an sms message
    :from => '+15555555555', # my Twilio number in actual code
    :to => number, # user's number
    :body => 'Download Flock and do more together: flockwithme.com/app' # text message content
  )
  redirect_to root_path
end
Making it Look Pretty Part 1: Adding a fancyBox
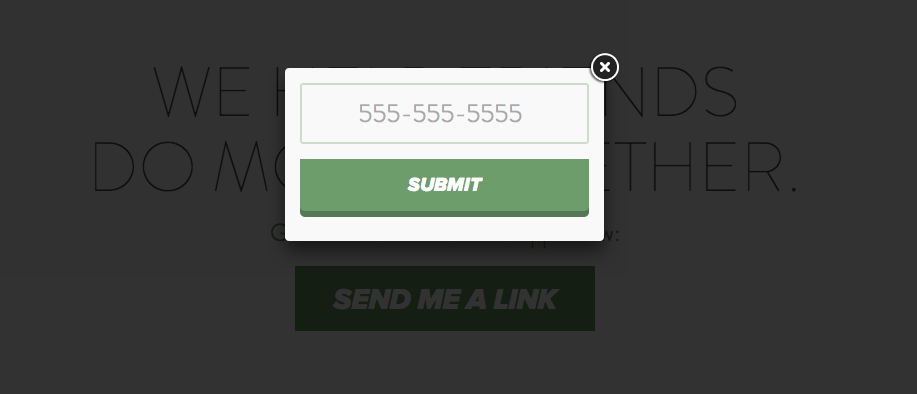
I wanted to use javascript on the “SEND ME A LINK” button so that the website didn’t have to load a new page to display the number form. Not wanting to re-invent the wheel, I looked around for js plugins and ended up choosing fancyBox, a library to easily implement “lightbox” popups.
To implement this plugin, there were a couple main steps:
- Create a hidden div containing the number form
- Link a button to the hidden div
- Add the necessary js from fancyBox
# STEP 1: Add hidden div containing form
# Note: id = "number_form"

<div style="display:none" class="text" id="number_form">
    <%= form_tag(send_text_path, :method => :post) do %>
      <%= text_field_tag(:number, nil, :placeholder => '555-555-5555')%><br>
      <%= submit_tag("Submit") %>
    <% end %>
</div>


# STEP 2: Creata a button that links to the hidden div
# Note: class = "fancybox" and href = "#number_form" (id of div from STEP 1)

<a href="#number_form" class="fancybox"><div>SEND ME A LINK</div></a>

# STEP 3: Add the fancyBox js to show the div when the button is clicked
# Note: I am calling the function "fancybox" on all links
#       that have a class named "fancybox" (from STEP 2)

<script type="text/javascript">
    $(document).ready(function() {
      $("a.fancybox").fancybox({
        maxWidth: 900,
        helpers : {
            overlay : {
                css : {
                    'background' : 'rgba(0, 0, 0, 0.8)'
                }
            },
        }
      });
    });

</script>
Making it Look Pretty Part 2: A Fancy Button

Once I got the fancyBox working, I wanted to customize the styling of the form. Earlier in the week I stumbled across an awesome link from Codrops that had examples of many different buttons using CSS. I chose my favorite and added the appropriate CSS.
The button I chose gives a 3D effect by creating a shadow and making the shadow smaller / shifting down the button while hovering over the button, and removing the shadow all together when clicked.
// Note I am using SASS, which allows me to nest my css

input[type=submit] {
  border: none;
  cursor: pointer;
  width: 100%;
  padding: 15px 0px;
  margin: 15px 0px;
  text-transform: uppercase;
  position: relative;
  background: $green;
  box-shadow: 0 6px #527a52;
  font-family: "proxima-nova", "sans-serif";
  font-style: italic;
  font-weight: 800;
  font-size: 1.2em;
  color: white;
  border-radius: 0 0 5px 5px;

  &:hover{
  box-shadow: 0 4px #527a52;
  top: 2px;
  }

  &:active{
    box-shadow: 0 0 #527a52;
    top: 6px;
  }
}
Making it Look Pretty Part 3: Responsive Design
Once I got the button looking sharp on a desktop browser, I then wanted to make the page responsive for mobile users. Not only did I want to change the styling so it looked good on a phone, but I also wanted to change the main button so that when a user opens the site on their iPhone the “SEND ME A LINK” button turns into a “DOWNLOAD THE APP” button that takes him or her directly to the App Store.
I made the button (and rest of the website) responsive using Bourbon and Neat. Bourbon is a mixin library for SASS, and Neat is a grid framework for SASS with Bourbon.
// STEP 1: Define a mobile breakpoint (Neat version of CSS media query)
$break_four: new-breakpoint(max-width 585px);


// STEP 2: Define style to hide elements where class = "mobile"

.mobile {
 display: none;
}

// STEP 3: Hide items where class = "desktop" and show
//         items where class = "mobile" at breakpoint

@include media($break_four) {
  .desktop {
    display: none;
  }
  .mobile {
    display: block;
  }
}
// STEP 4: Add classes where appropriate

<div id="button">
    <a href="#number_form" class="desktop fancybox"><div>SEND ME A LINK</div></a>
    <a href="http://bit.ly/11LgLAn" class="mobile"><div>DOWNLOAD THE APP</div></a>
</div>
And that’s how to create a simple landing page for a mobile app!